How to Build a Basic Kubernetes Setup
Juan Cabrera
May 8, 2020

Kubernetes is a robust container orchestration platform. It can manage your containers, schedule them in different nodes depending on the available resources, automatically scale your infrastructure in response to demand, and many other things.
When faced with the task of deploying their applications, most developers will usually look for the solution with the lowest friction, either by going with a fully managed provider (e.g: Heroku) or by rolling their own simple deployment scripts (i.e: ssh into server, pull Docker images, start containers).
As your project grows you'll spend more and more time tweaking your deployment scripts, you'll add more servers, you'll need to run commands before or after your deployment is finished, you'll want to be able to revert to a previous version of the software if anything fails, then you'll need to have a health checking system in place for all those services... at some point you'll start to realize that your script is becoming a container orchestration platform in itself and that you probably should stop working on it.
You might feel that using Kubernetes for a one- or two-container project is overkill or unnecessary, but the flexibility gained by going with Kubernetes cannot be understated. You'll have a standard way of managing your system, you'll be able to easily grow your stack if need be, and you'll also gain the ability to migrate from one cloud provider to another more easily.
Nowadays, most cloud server providers have a Kubernetes offering of their own. This means that getting your Kubernetes clusters up and running is very easy. We are going to use DigitalOcean for our examples here, but you should be able to do the same thing with Amazon Web Services and other providers.
Setup
Let’s create a new Kubernetes cluster in DigitalOcean and configure the kubectl utility to talk to it.
- Log into your DigitalOcean account and click on Kubernetes in the left hand side panel,
- Click on "Create a Kubernetes Cluster"
- Select a region and reduce the number of nodes to 1, as we are not going to need anything more than that for now.
- Click on "Create Cluster". You’ll see a progress bar at the top. Your cluster will be ready once that bar gets hidden.
- Install Kubectl. You’ll need this tool to manage your Kubernetes cluster.
- Follow This Guide to configure the doctl tool to connect kubectl to your cluster. Another option is to click on "Download Config File" and pass that file to kubectl to connect to your cluster:
$ kubectl --kubeconfig=path/to/config-file.yaml <commands>
We should now be able to use the kubectl command to talk to our cluster.
$ kubectl get nodes
NAME                    STATUS   ROLES    AGE     VERSION
pool-dsayjvr1j-33ipn    Ready    <none>   8m44s   v1.16.6
If we are using the config file approach, then the above command should read something similar to this:
$ kubectl --kubeconfig=path/to/k8s...kubeconfig.yaml get nodes
NAME                    STATUS   ROLES   AGE   VERSION
pool-dsayjvr1j-33ipn    Ready    <none>  12m   v1.16.6
We can see that our cluster consists of one node (i.e: one Kubernetes worker machine).
If we are using the kubeconfig file method, we can't forget to pass the --kubeconfig option to kubectl everytime. From now on, all invocations of kubectl will appear without the --kubeconfig option, so we should adjust accordingly.
Pods and Deployments
Kubernetes defines pods as "the smallest deployable units of computing that can be created and managed in Kubernetes." A Pod can be composed of one or more containers. Our Pods in this example (as is the case usually) will be composed of one container only.
Deployments, on the other hand, describe the system’s desired state with regards to Pods, i.e: we can create a deployment that requests two instances of a particular Pod to exist, and Kubernetes will then try to honor that requirement the best it can based on the available resources.
We are now going to make Kubernetes deploy our frontend application. Let’s create a new file called "frontend.yaml" with the following contents:
kind: Deployment
apiVersion: apps/v1
metadata:
  name: frontend
spec:
  replicas: 1
  selector:
    matchLabels:
      app: frontend
  template:
    metadata:
    labels:
        app: frontend
    spec:
      containers:
    - name: frontend
        image: sophilabs/k8s-demo-frontend
        ports:
        - name: http
          containerPort: 80
The first two lines tell Kubernetes that we are defining a Deployment using version apps/v1 of the schema. Next comes the "metadata" section where we give a name to the Deployment we are creating, in this case “frontend”.
The "spec" section is where we actually define the desired state for our Deployment. First we declare that we want at least one replica of the Pods that match the given “selector”. The “selector” section specifies how the Deployment should select which Pods it acts upon; in this case it will match any Pod that has been labeled “app: frontend”.
The "template" section is where we define our Pod. Much like the Deployment itself, it contains a “metadata” section where we add the “app: frontend” label to the Pod. Then comes the “spec” section where we define the containers that will live inside this Pod.
In this case, we have one container named "frontend" using the “sophilabs/k8s-demo-frontend” Docker image. The ports section defines the ports, and the container exposes and gives them a name, in this case “http” and port 80. We’ll use the port name later.
Now it’s time to tell Kubernetes to honor this deployment.
$ kubectl apply -f frontend.yaml
deployment.apps/frontend created
We can now inspect our Kubernetes cluster.
$ kubectl get deployments
NAME      READY  UP-TO-DATE  AVAILABLE  AGE
frontend  1/1    1           1          5s
Here we can see that our "frontend" deployment was created and is ready. Let’s see if our frontend Pod was created:
$ kubectl get pods
NAME                       READY    STATUS  RESTARTS   AGE
frontend-84865ff7bd-d5w4w  1/1      Running     0          8s
Great, our pod is also up and running. Bear in mind that this process takes a few seconds. Keep running the "get deployments" and “get pods” subcommands until the “ready” column shows “1/1.”
We can now run commands on the frontend pod and take note of the name of the Pod we got with the "get pods" command.
$ kubectl exec frontend-84865ff7bd-d5w4w -- ls
bin
boot
dev
...
var
And just like that, we ran the "ls" command on the frontend container and we didn’t have to configure SSH keys, hostnames, or anything. Great!
If we want to get a shell into a running container, we can do that with:
$ kubectl exec -ti frontend-84865ff7bd-d5w4w -- sh
/ # ls
bin dev etc home  lib media mnt opt
proc  root  run sbin  srv sys tmp usr
var
/ #
How are we going to make a request to that Pod now? Well, before we look into how to do that properly, let’s check out another awesome feature of kubectl: "port-forward"
$ kubectl port-forward frontend-84865ff7bd-d5w4w 9080:80
Forwarding from 127.0.0.1:9080 -> 80
Forwarding from [::1]:9080 -> 80
Now all requests we make to localhost:9080 will be sent to the Pod’s 80 port!
Open a browser and go to http://localhost:9080
This couldn’t be any easier. How about checking the container’s logs?
$ kubectl logs frontend-84865ff7bd-d5w4w

127.0.0.1 - - [23/Apr/2020:18:50:08 +0000] "GET / HTTP/1.1" 200 77 "-" "Mozilla/5.0 (X11; Ubuntu; Linux x86_64; rv:75.0) Gecko/20100101 Firefox/75.0" "-"

2020/04/23 18:50:08 [error] 6#6: *1 open() "/usr/share/nginx/html/favicon.ico" failed (2: No such file or directory), client: 127.0.0.1, server: localhost, request: "GET /favicon.ico HTTP/1.1", host: "localhost:9080"

127.0.0.1 - - [23/Apr/2020:18:50:08 +0000] "GET /favicon.ico HTTP/1.1" 404 154 "-" "Mozilla/5.0 (X11; Ubuntu; Linux x86_64; rv:75.0) Gecko/20100101 Firefox/75.0" "-"
You should now see the logs nginx generated when you viewed the page!
Services
We now have a frontend server running in our Kubernetes cluster, but we cannot access it without running the port-forward command. In order to expose our frontend application to the outside world, we need to create a "Service"
The Kubernetes documentation defines a "Service" as “An abstract way to expose an application running on a set of Pods as a network service.”.
There are several ways to configure Services in Kubernetes. We are now going to focus on "NodePort" services. A “NodePort Service” configures a port in the nodes that will proxy incoming traffic into the Service.
We create a frontend-service.yaml file with the following contents:
kind: Service
apiVersion: v1
metadata:
  name: frontend
spec:
  type: NodePort
  selector:
    app: frontend
  ports:
  - name: http
    protocol: TCP
    port: 80
    targetPort: http
Here we define a Service named "frontend" of type “NodePort” for all Pods that are labelled “app: frontend." It proxies traffic from port 80 into the container’s port named “http” (remember we named the frontend container’s port 80 as http).
We need to apply this yaml file:
$ kubectl apply -f frontend-service.yaml
service/frontend created
Let’s inspect the Service we just created.
$ kubectl describe service frontend
Name:                   frontend
Namespace:              default
Labels:                 <none>
Annotations:            Selector:  app=frontend
Type:                   NodePort
IP:                     10.245.4.91
Port:                   http  80/TCP
TargetPort:             http/TCP
NodePort:               http  30695/TCP
Endpoints:              10.244.0.31:80
Session Affinity:       None
External Traffic Policy:  Cluster
Events:                 <none>
The output shows that the "NodePort" assigned for this Service is 30695. We now need the external ip address of our node.
$ kubectl describe nodes | grep ExternalIP
ExternalIP:  159.89.140.126
You should now be able to access the frontend server by visiting: http://159.89.140.120:30695 (Of course, replace these numbers with whatever kubectl returns in your case.)
There’s another important aspect of having created this frontend Service. Now the frontend server is accessible with the frontend name throughout the cluster, i.e: we can send a request to [<http://frontend>](<http://frontend>) from within the cluster and the request will reach one of the frontend Pods we are running (at the moment, just the one). Let’s try this out:
We get a shell into the frontend container and run curl http://frontend.
$ kubectl exec -ti frontend-84865ff7bd-d5w4w -- sh
# curl http://frontend
<!DOCTYPE html>
<html>
  <body>
      <h1>Hello</h1>
  </body>
</html>
We are now going to delete the service we just created.
$ kubectl delete -f frontend-service.yaml
service "frontend" deleted
Let’s try running the curl command again:
$ kubectl exec -ti frontend-84865ff7bd-d5w4w -- sh
# curl <http://frontend>
curl: (6) Could not resolve host: frontend
We can see that without the "frontend" service definition, we no longer can reach the frontend Pod by using the “frontend” domain name.
Ingress Controller
Our frontend application is of little use if we cannot easily have a human readable domain name to reach it. The usual way in which we do this in DigitalOcean and most of the other cloud providers is to create a Load Balancer and let the cloud provider manage our DNS rules for us. Kubernetes provides Load Balancer Services, which are able to create a Load Balancer using your cloud provider’s API and configure it to point to the Service inside the cluster. This type of service would work in our case because we only have one frontend Service, but what do we do if we need fine grain control on how we route traffic inside our cluster? For that we can use an Ingress-Controller.
Ingress controllers are HTTP servers (like Nginx) modified to be aware that they are running inside a Kubernetes cluster. This allows them to respond to cluster events like creation and deletion of Ingress resources; these Ingress resources are used to configure the Ingress Controller to implement our routing requirements.
We are going to use the Helm tool to install our ingress controller.
Go to the Helm website and install the program.
Then run these commands:
$ helm repo add stable [<https://kubernetes-charts.storage.googleapis.com/>](<https://kubernetes-charts.storage.googleapis.com/>)

$ helm install nginx-ingress stable/nginx-ingress
If you are using the --kubeconfig parameter for kubectl, add --kubeconfig=path/to/k8s-....-.yaml after the helm command, e.g., helm --kubeconfig=path/to/file.yaml install <etc,...>
Let’s see what’s changed in our cluster:
$ kubectl get pods
NAME                                           READY  STATUS  (...)
frontend-84865ff7bd-d5w4w                      1/1    Running (...)
nginx-ingress-controller-676d7fcf55-5cwtq      1/1    Running (...)
nginx-ingress-default-backend-5b967cf596-w6kd4 1/1    Running (...)
Helm has added two more pods to our cluster.
Let’s check our services:
$ kubectl get services
NAME                           TYPE           CLUSTER-IP      EXTERNAL-IP     PORT(S)                     AGE
kubernetes                     ClusterIP      10.245.0.1      <none>          443/TCP                     27h
nginx-ingress-controller       LoadBalancer   10.245.108.229  167.172.10.106  80:31122/TCP,443:31442/TCP  15m
nginx-ingress-default-backend  ClusterIP      10.245.17.126   <none>          80/TCP                      15m
We now have an nginx-ingress-controller service of type “LoadBalancer,” which means that Kubernetes created a DigitalOcean LoadBalancer pointed at our new Ingress Controller!
Log into your DigitalOcean account, click on the Networking link (left hand side panel), click on the "Load balancers" tab, and you should see your new load balancer there.
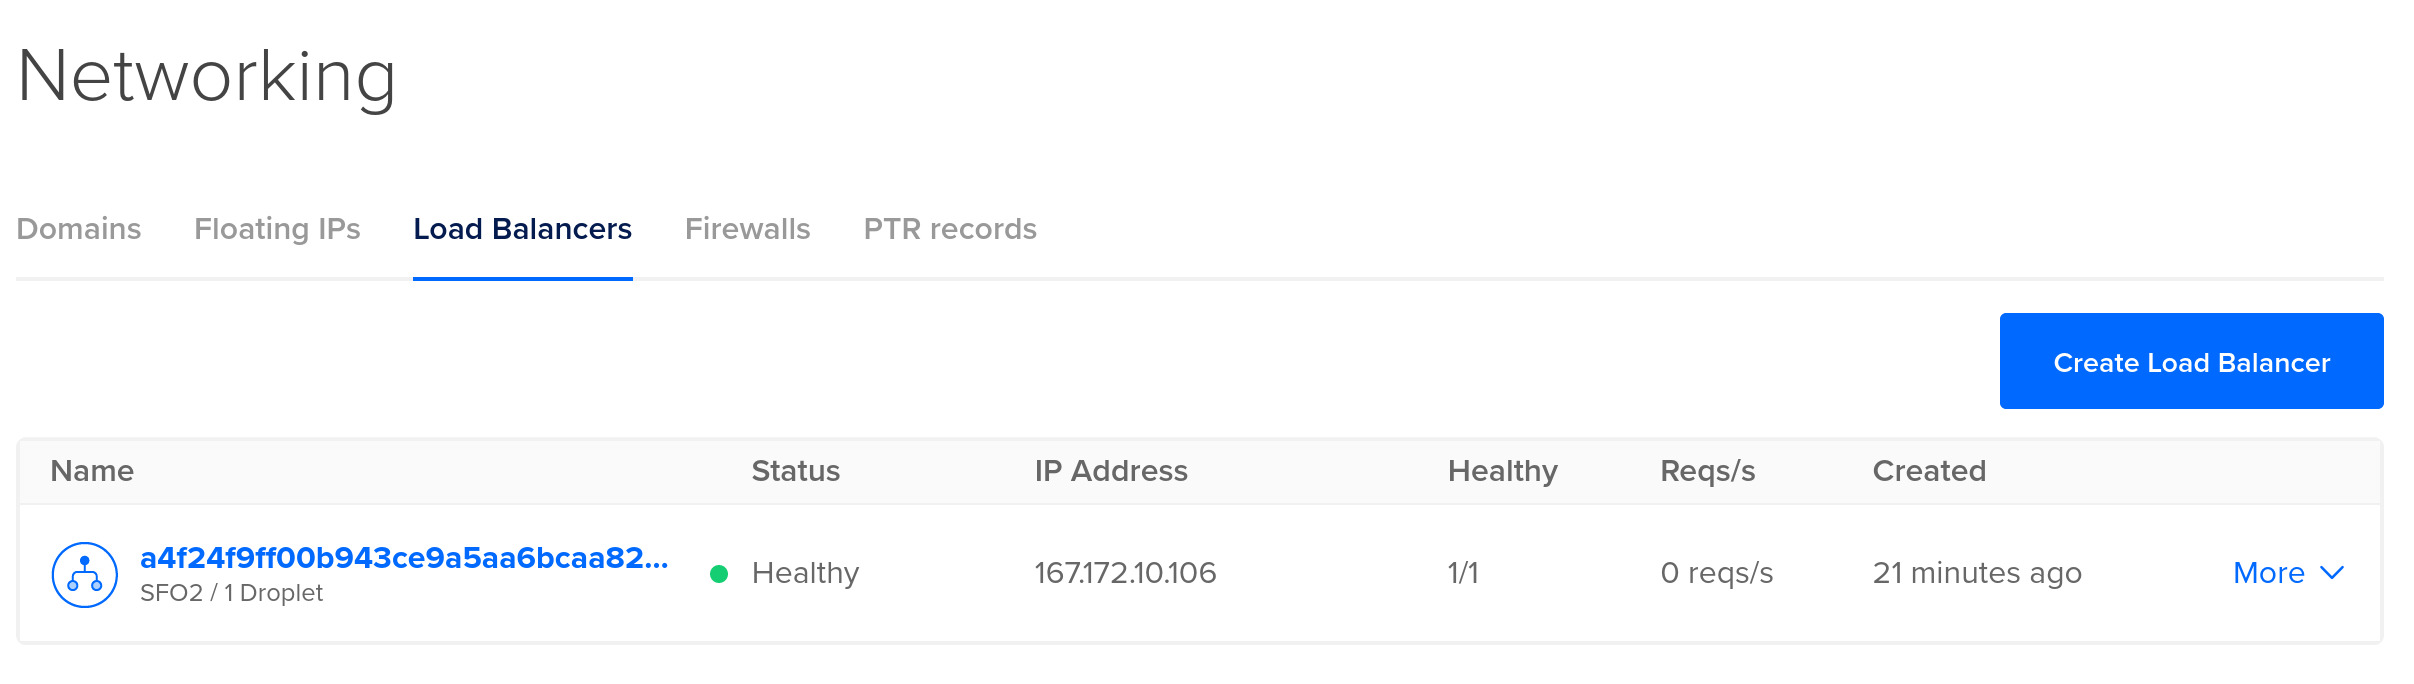
Note that the IP address of the load balancer is the same as the one we got with kubectl: “167.172.10.106” in our case.
The only thing left to do now is to reinstall our frontend service and add an Ingress route pointed at it.
Open the frontend-service.yaml file we created earlier and remove the type: NodePort line. This will make our frontend service accessible inside our cluster only.
Apply the service file:
$ kubectl apply -f frontend-service.yaml
Next, create a frontend-ingress.yaml file with the following contents:
kind: Ingress
apiVersion: extensions/v1beta1
metadata:
  name: frontend
  annotations:
    kubernetes.io/ingress.class: nginx
spec:
  rules:
  - http:
    paths:
    - path: /
        backend:
          serviceName: frontend
          servicePort: http
You can see here that we are defining a new routing rule. Every request that comes with path / will be routed to our frontend service on port "http" (i.e: port 80 as defined in frontend-service.yaml).
We copy our load-balancer’s IP address and visit the site: http://167.172.10.106/ We should see the "Hello" page again!
And that’s it! The only thing left to do is to point a domain name to our new Load Balancer; we can read about how to do this in our cloud provider’s documentation.
Further Reading
This was a small guide to help you get a basic but complete setup with Kubernetes. I’m sure you still have many unanswered questions; you can find a lot more information and guides on kubernetes.io. I recommend starting with the interactive tutorials and moving your way up from there.

When and How to Configure a Read Replica Database in Django
Enabling read replicas in Django is pretty simple, and it can improve the performance of the application. In this post we will focus on performance issues related to the database.

Why You Should Choose Your DBMS's Full Text Search Over a Dedicated Search Engine
If your project already uses a DBMS and you are uncertain whether to use a dedicated search engine, today we will share 3 reasons why you should *not*.
Photo by sophilabs.
Categorized under research & learning.