Git Fundamentals
Daniel Chia Chung
June 14, 2019

Git is a Distributed Version Control System (DVCS), a tool used to develop and maintain software. It allows you to develop software in incremental steps and gives you a view of the project's history. As a developer, this is useful as once you learn the fundamentals, you will have an easier time keeping track of your work.
Prerequisites
- Git is installed locally
- Github / Gitlab account
Without going into much detail, the Git model has two levels, Staging and History. Staging is where current work resides. History is a ledger of all the changes that have been made in the project. The way Git works is that at any point in time, there will be a remote copy of the project (hosted on Github / Gitlab) and several copies of the project (typically in developers' machines). As developers work on features, these changes are first made locally and then synchronized to the remote repository. This allows for effective collaboration and provides a safety net in case something happens to a machine that contained work.
Basics & Example
- To get started, create a repository on Gitlab and then clone it to your local machine.
- Here are the commands we will be going over for basic workflow:
git statusgit addgit commitgit push
Let’s use a simple python function as an example, start by creating a file calculator.py and add:
def add(x, y):
    return x + y

print add(5, 3)
Run git status, you will see the following:
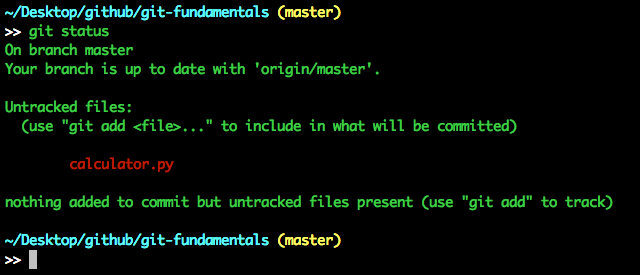
It says that the file is not tracked, let's add it into Staging, git add calculator.py
Run git status again and now the file is being tracked:
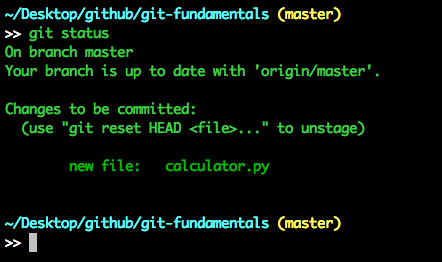
Once the file is in staging, we can commit the change into history, git commit -m “Adding addition function to script”
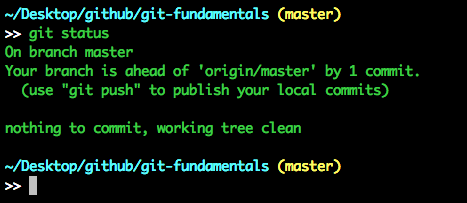
Running git status again shows that the repository doesn't have anything in Staging, but it differs from the remote repository by being one commit ahead:
We can see the change in history by running git log and seeing a list of the commits that were made.
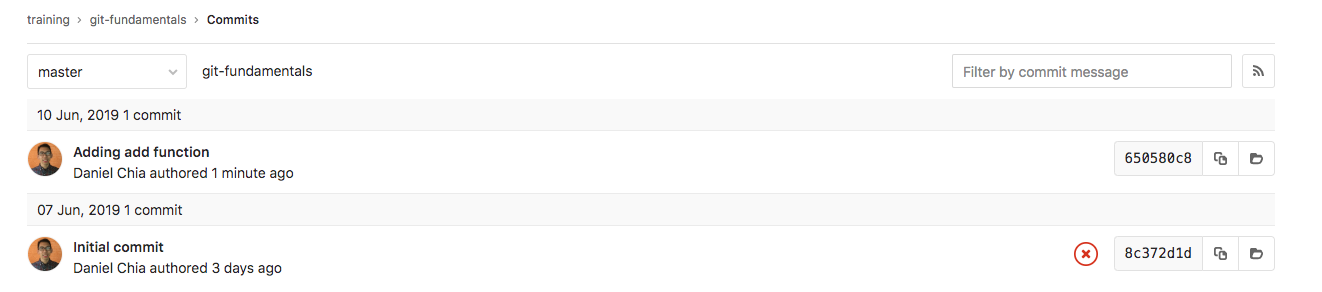
To synchronize the changes we just made to the remote repository, we must push these changes into the remote repository, do this with git push. Go to repository page on Gitlab and see that the commit is present.
Branches
A note on git branches, branches are references to a commit hash. This allows us to jump around the project and see changes at that specific point in time. To jump around branches, run git checkout <branch_name>.
Branch Development Workflow
In this section, we will go over how a team of developers commits changes into a project via the branch development workflow. When a developer sets off to work on a feature, the procedure looks like this:
* Latest work from the master branch is pulled locally
* Create branch, work on the feature and commit changes
* Push up changes to the remote repository for another developer to review
* After the code has gone through review and testing, merge into master branch
Other Tips
Aliases
Aliases are word shortcuts that you can define. Typing git commands can get repetitive and using aliases can save you time. Here are a few examples:
# in your .bash_aliases
alias g="git status"
alias gd="git diff"
alias gaa="git add -A"
alias gcm="git commit -m"
alias gco="git checkout"
alias gpoh="git push origin HEAD"
Git Tree Visual
Getting a visual of how the current git tree looks like helps visualize the project's development, to see the tree run:
"git log --graph --oneline --decorate --all", place this under an alias ie. gg (git graph)
Resetting
At times we will want to revert changes, two helpful commands are:
* git reset, to removes changes that are in Staging
* git reset --hard, to wipe away all your changes
Stashing Changes
Stashing changes is helpful when you need to navigate to another area in the project and you have modifications that haven't yet been committed. For example, you are developing a feature in feature_x branch, suddenly there is a critical bug that needs to be fixed, you need to jump to the master branch and fix the change. In order to jump to master, first you have to put away your changes, this is where the stash command comes into play.
git stash, store away changesgit stash pop, to restore changesgit stash list, view all stashes
Git Blame
Another useful git feature is blame, git blame lets you view the last commit that modified each line in a file.
This is useful as seeing the commit will give more clarity as to why the developer wrote that particular line of code.
git blame <file_name>
Last Thoughts
We have touched on the fundamentals of git, enough for a beginner to get started and use it on upcoming projects. Learning Git will take some time but once you know enough, it will be tool that will always be at your disposal and it will help you write software with confidence.
Further reading

Git Flow
You can not just introduce new features into master, or release hotfixes in master without merging into staging (or vice versa). Using git flow you will learn how to follow a workflow.

Code quality enforcement tools
This is a series of posts describing some of the tools we use to keep our code clean and enforce best practices and project-specific standards. Read on, to find out more.

Gilp: A node tool to implement pre-commit and other git hooks
Git has a lot of hooks for client and server side but the most used and known hook is pre-commit, where you can run some validations (like linters) and cancel a commit if something fails.
Photo by Jeremy Bishop under this license.
Categorized under research & learning.